Image Source: Shutterstock
When you think about a pigeon, what is the first thing that strikes your mind? Probably a beautiful bird, flying freely in the sky. This bird has freedom of movement.
In our body, the spine is like a pigeon which requires freedom of movement, but our daily habits make it stiff and hard. In Yoga, one can provide freedom of movement to his/her pigeon (spine), by an asana that is Kapotasana.
Kapotasana: The Pigeon Pose
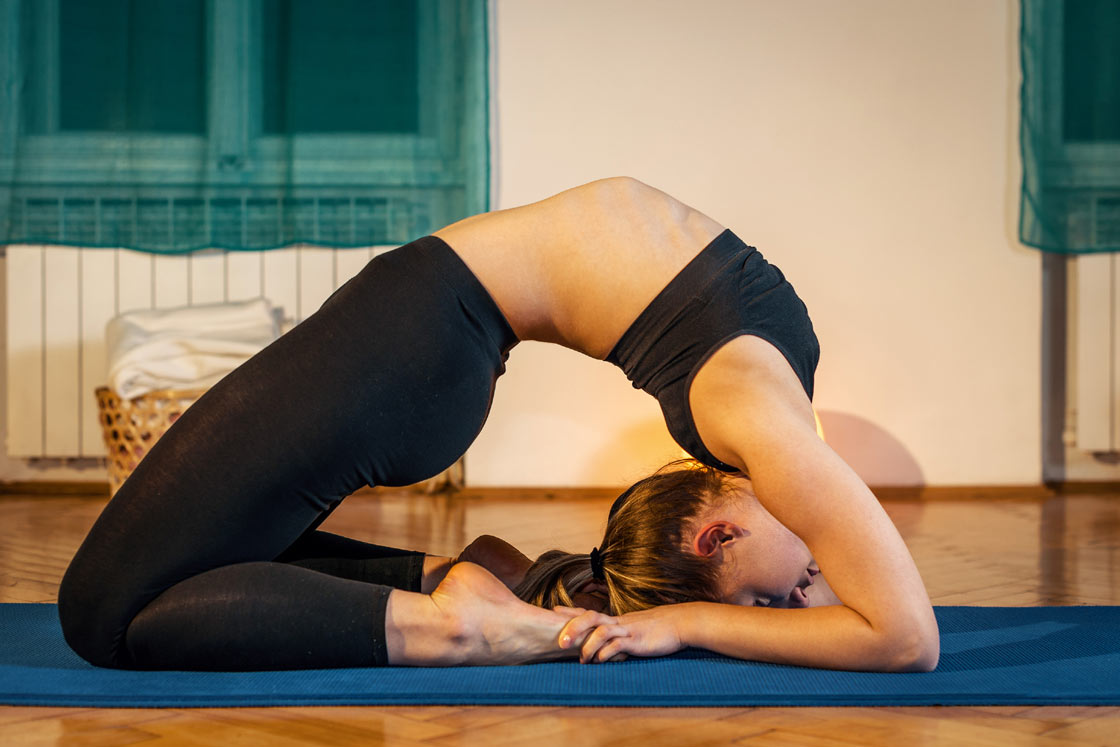
Kapotasana is a deep backbend pose, that falls in the category of advanced asanas. This pose is quite challenging Yoga Asana, which includes a good stretch of overall body, especially core and back.
After this asana, the practitioner feels more energy and power in his/her back and brain. It helps a lot in the strength and flexibility of the back and the core.
Meaning & Origin
In this asana, the body looks similar to a pigeon. The structure of the feet resembles the back portion and tail of pigeon. Moreover, the structure of the torso resembles the upper part of the pigeon. It might be a reason why we call it Kapotasana.
But, if you look at ancient scriptures like Mahabharata and Kalika Purana, you will come to know about an ancient and great sage, Kapota. Because of his wisdom, strength, and powers, people used to call him “son of the mighty bird, Garuda (Vehicle of Lord Krishna)”.
It is believed that Kapotasna is named after this great sage, Kapota.
For Whom Kapotasana is Most Beneficial
Although, every person should try to perform Kapotasana, as it helps in the overall flexibility of the body. But, it is most advised to some special category of people. Here is the list of category, who must perform this asana from today.
Students
- Many students read or write with the wrong body posture. They bend their neck and back excessively which affects their back and neck a lot. This asana will help them to improve their body posture and strengthen their neck and back. Also, this will aid their brainpower.
Person Having a Desk Job
- Many of us spend most of their time in the office, sitting in a chair for prolonged hours. This affects our spinal health and overall body posture. So, if you have a desk job, you should perform Kapotasana, for better spinal health and body posture.
How to Do Kapotasana
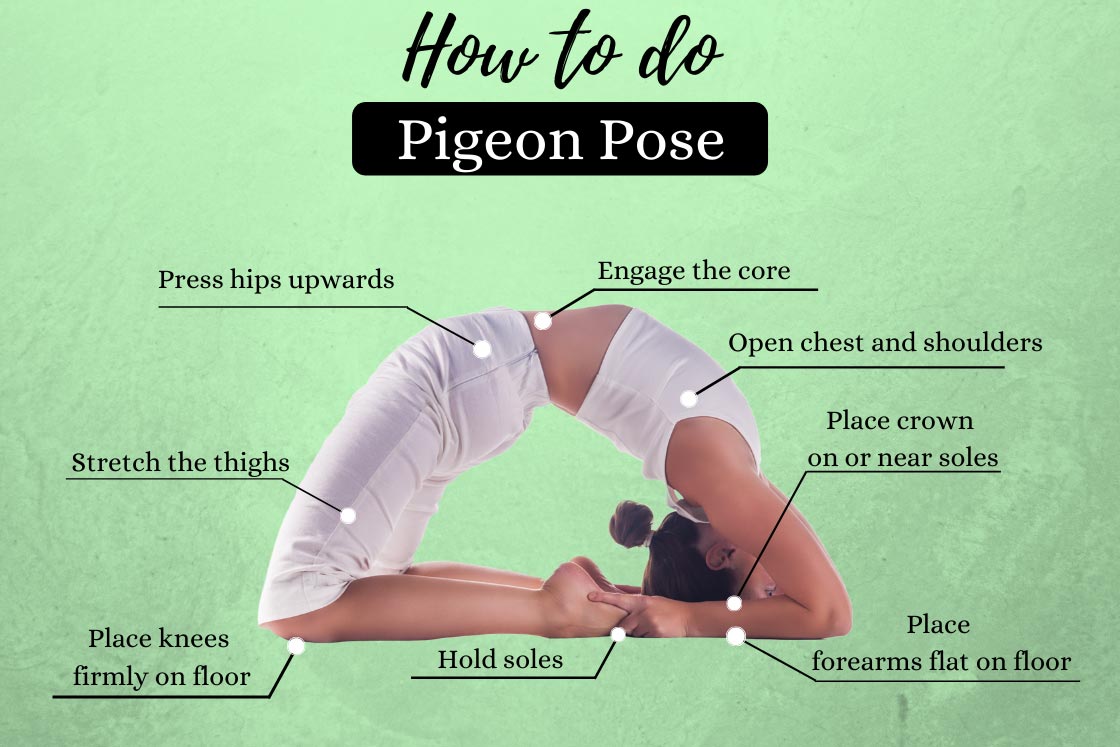
Image Source: Shutterstock
As Kapotasana is an advance level asana, so, it needs a bit more flexibility and stretch than beginner level asanas. In the following steps, you will see how to perform Kapotasana.
Step by Step Instruction of Kapotasana
The steps to perform Kapotasana for beginners are a little different from the steps for advanced practitioners. So, let’s discuss them one by one.
Reference – Light on Yoga (BKS Iyengar)
1. For beginners
Preparing the Pose
- Firstly, sit in Vajrasana. If you want, you can place a folded blanket under your knees.
- Now, recline your trunk, backward, and lay your back flat, on the floor. You can use your hands for assistance on reclination. Leave the hands free ones you have laid your back on the floor.
- Now, fold the elbows and bring your arms just above the shoulders. Place your palms near the ears (a little apart), fingers pointing towards the shoulders.
Getting Into the Pose
- Now, stretch your arms bringing your body weight on your palms, and lift the whole body above the knees, stretching the thighs. Then join your feet. You have to do it simultaneously.
- Now, in the same position, bend your elbows and bring your palms towards the toes. Then hold the toes with palms and bring the elbow & forearms flat on the floor. You will need to contract the buttocks and stretch of the entire spine, to come to this position.
- Now, tighten the muscles of the thighs and raise the pelvic floor a little more. Then hold the heels of the feet with palm and bring your head towards the feet. Then place your crown of the head on the soles of the feet.
Now hold the same position for a few seconds (according to your comfort). With practice, try to increase the time up to one minute, gradually.
Releasing the Asana
- When you are done, take a deep breath. Release the grip of the palms and take off the head from the soles of the feet. Slide your elbows forwards and lift the forearms off the floor. Then, slowly lower the body, bring the pelvic floor, and hips down.
Do this till your back comes flat to the floor. Here you will lay on your back and your feet will be under your hips, as in the beginning.
- Now, straighten the feet one by one and relax on the floor.
Now, let’s see how to do Kapotasana in advance level
2. For Advanced Practitioners
Preparing the Asana
- Come to your knees on the floor, keeping the thighs perpendicular to the floor. You can place a folded blanket under your knees for your comfort.
- Keep the knees and feet together. Feet should be flat on the floor, soles facing upwards.
- Place the hands on the hips.
Getting into the Pose
- Now, with the support of hands, stretch and bend the entire spine back, towards the floor.
- Then, take the arms over the head and grab the heels of the feet with palms. Then take a few breaths.
Till here, your hands will be on your heels, your back will be bend and your elbows will be in the air.
- With an exhalation, bend your back further. Then bend your elbows and place them on the floor.
- Now, stretch your neck and place the crown of your head on the soles of your feet.
- Then, lift the pelvic floor, stretch a little more and grab the ankles of your feet. You may need to contract your buttock and stretch your thighs more to come to this position.
Now, breathe normally and hold this position for 30 seconds up to one minute (depends on your capacity).
Releasing the Asana
- Release the grip of hand at the ankle of feet.
- Now, with an exhalation, straighten the arms and slowly – slowly bring the body forwards.
Here you will be standing on your knees as in the first step.
- Now, rest on the floor and relax.
Contraindication and Precautions for Kapotasana
Kapotasana is an advanced level asana. Any mistake in this asana can cause you injury. So, perform it in the guidance of an expert. Here is a list of precautions you need to take in the practice of Kapotasana.
- Do not overstretch your body. Understand the limits of your body and stretch according to it. Overstretching can cause you an injury.
- If you have any recent or deep injury in your spine, neck, shoulders, chest, core, hips, thighs, back, and ankles, do not perform this asana.
- Perform this asana only in an empty stomach or after 4-6 hours of taking a meal.
- If you feel any pain in your spine, neck, shoulder or thighs, release the pose immediately.
- As this asana changes the influences the blood flow, so, you should avoid it in the following disorders: hypertension, insomnia, headache, migraine, and depression.
- Women in pregnancy or mensurational cycle should avoid Kapotasana.
- If you are having stuff or tight thighs, you might feel it difficult then others. But, with practice, you can improve your thighs.
Benefits of Kapotasana
Kapotasan is an excellent stretching pose, that stretches almost every part of the body. In increases the flexibility as well as strength of the body muscles, especially the back, pelvis, and thigh muscles. It comes with various benefits described below.
Physical Benefit
- In Kapotasana, the blood flow circulates better around the spinal columns. This tones and strengthens the entire spine.
- The stretch on the pelvic floor in this asana maintains the good health of your genitals or groins.
- It tones the core muscles as there is a stretch on the abdomen region, during this asana.
- In this asana, the chest expands, and the diaphragm is lifted up properly. This helps to keep the heart, healthy.
- During Kapotasana, the stretch in thighs acts as a massage to the thighs. This asana helps to remove stiffness of thighs.
Spiritual Benefits
- Kapotasana expends the chest that increases the flow of Prana in the body.
- In this asana, we apply a gentle stretch on the muscles of the head. Along with the backbend, this regulates the flow of blood to the brain and the flow of prana to Crown Chakra. Thus it helps in stimulation of the Crown Chakra
Also, it prevents many mental illnesses such as stress, anger, and many other negative emotions, and, improves your mood.
