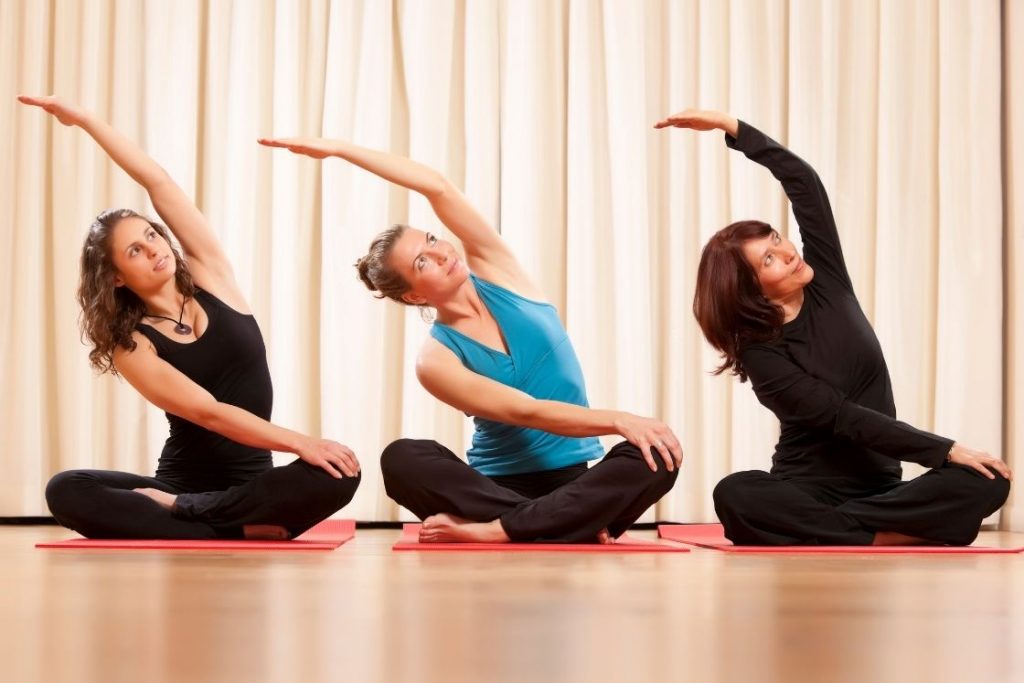
Yin Yoga is a passive form of yoga where most poses are performed either sitting, reclining, or lying down completely on a yoga mat. The main aim of this yoga style is to focus on stretching and strengthening the connective tissues rather than the muscles.
Another unique quality of this yoga style is that you hold the pose for a longer duration, typically for 3-5 minutes. And with the help of multiple props, you can support your postures and obtain a deep stretch.
There are 26 poses that make up Yin Yoga which will help in removing stress and tension from the lower half of your body.
In a typical yin yoga class, you will often perform 5-6 poses as you need to hold the pose for a longer period than the traditional yoga poses. You can begin with poses such as butterfly, child’s pose, straddle, shoelace or half-shoelace, banana, and will gradually start practicing more deep poses such as the sphinx, spinal twist, happy baby, seal, etc.
Why are Yin Yoga poses names different than the traditional asanas?
While the concepts of Yin Yoga can be found in the Chinese philosophy of Taoism and Yin and Yang, it was propagated by a western yogi. Hence, you will notice that a majority of yin yoga poses have an English name only.
More often than not, most Yin Yoga teachers will give twists to these names as the pose name are not concrete. The names of the poses are based on the way you perform them, hence it is quite easy to change their name in a way the practitioner understands.
It is noteworthy that these poses are a variation of traditional hatha yoga asanas. So it is safe to say, that the roots of yin yoga somehow lie in the Indian Yoga techniques.
The modified names of some common yin yoga poses are;
- Seal pose is similar to the Cobra pose or Bhujanasana.
- Square pose is the variation of the Easy Pose or Sukhasana.
- Dragon pose is a Low Lunge with slight variation.
- Savasana is the traditional Corpse Pose but with hands and legs spread like a star.
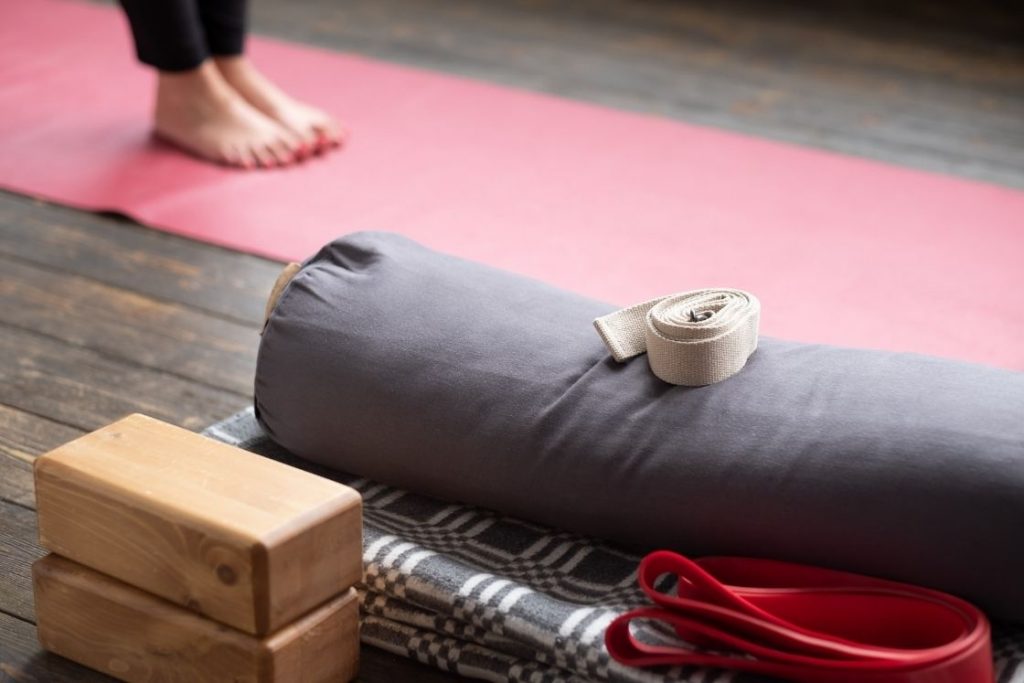
Props you need for Yin Yoga poses
The focus of Yin yoga is to get your mind and body relaxed by stretching your fascia. When the stiffness in these connective tissues gets reduced, you will be relieved of the aches, blockages, and discomfort that have been left unattended.
To help achieve this, Yin Yoga often uses multiple props for support and to obtain a deep stretch. This is done to find the edge where your body can maintain the pose without causing a strain or injury.
Some common props that are used in Yin Yoga are:
- Cushions – mostly used to create a firm foundation and gain height in seated poses
- Sandbags – adds weight and resistance
- Bolsters – to relax the body by reducing stress from bones
- Blanket – used for foundational support, increase height, relax the body, as a yoga mat
- Straps – opens the body and limits unwanted movement
- Blocks – for support and increasing height
Apart from the above props, which are generally available in Yin Yoga classes, you can substitute them for other items if you are practising yoga at home. You can use towels, chairs, walls, stairs, books, ropes, etc, or take help from your friends, family members, or spouse.
The idea is to use props to focus on the target areas and remain still in a pose. If it doesn’t serve this purpose, there is no use for a prop.
Yin Yoga poses you can try
While some of the poses may seems similar to vinyasa or other yoga styles poses, it’s worth to give try yin yoga postures. You will experience the difference the way to come into a posture and be into it for a while.
Please note that all the poses should be held for at least 3-5 minutes. If you are a beginner, you can start by 1-2 minutes and gradually increase the time. With practice, you can even go up to 7 or 10 minutes as well.
1. Yin Butterfly pose – Ideal for beginners
This yin yoga pose is beneficial for opening the hip joint and can be practised easily without pushing yourself too much in an uncomfortable stretching.
Yin butterfly is modified version of baddha konasana. It can help you stretch your lower back without much strain on the hamstrings. It is one of the most beneficial poses for women as it helps in regulating their periods, makes childbirth easy, and improves ovaries functions.
If you keep the legs straight and feet a bit further from the groin, you will get a satisfactory hamstring stretch.
How to do it:
- Sit on a yoga mat or a blanket.
- Put together the soles of your feet and slowly straighten the legs.
- While straightening the legs, bend forward allowing your spine to make a fold.
- Your hands can be on the mat or hold your feet. When you will hold your feet, the legs and arms will bend, creating a butterfly wing-like pattern.
- Bend your head towards your feet.
- To come back, push away from the floor through your hands and roll up slowly. Lean back slightly to unlock your hips and then straighten your legs completely.
Variations
- Use a cushion or rolled blanket to support your hips.
- Support your head with your hands, keeping the elbows on a block or your thighs.
- You can use a bolster to support your bend and the chest area.
Contraindications
If you are suffering from sciatica, either avoid practising this pose or use a cushion to elevate your hips enough that your knees are below the hips.
If you’ve recently suffered whiplash or any recent injury, do not bend your head.
Keep your spine straight if you have issues with flexion of the spine or lower back disorders. Use a bolster to keep your back straight or practice a reclining version.
2. Banana Pose – To increase blood circulation and stretch full body
Just as the name suggests, you will be bending in the shape of a banana. This is one interesting pose that stretches your entire body. It helps in lateral spine flexion and works on the stomach and ribs cage muscles. You also get a healthy armpit stretch, which not a lot of poses give. Moreover, your circulation also improves while keeping the stretch.
How to do it:
- Lie down straight, with legs joined, on a yoga mat or blanket.
- Pull up your arms and hold the elbows or clasp your hands over your head.
- Make sure your glutes are firm on the mat and stretch your arms and legs towards the right. You should make an arch like a ripe banana. Be aware of your edge and stretch to the right as far as you can.
To come out of pose, just bring back your legs to the original position and straighten your arms.
After a minute of rest, repeat the process on the left.
Variations
- If you need a deeper stretch, you can crossover your ankles when you have stretched your legs as far as you can.
- You can use a bolster, cushion, or rolled blanket to support the arms.
Contraindications
For people with lower back issues, it is better to practice this pose in moderation or avoid it completely.
3. Sphinx pose – To ease lower back pain
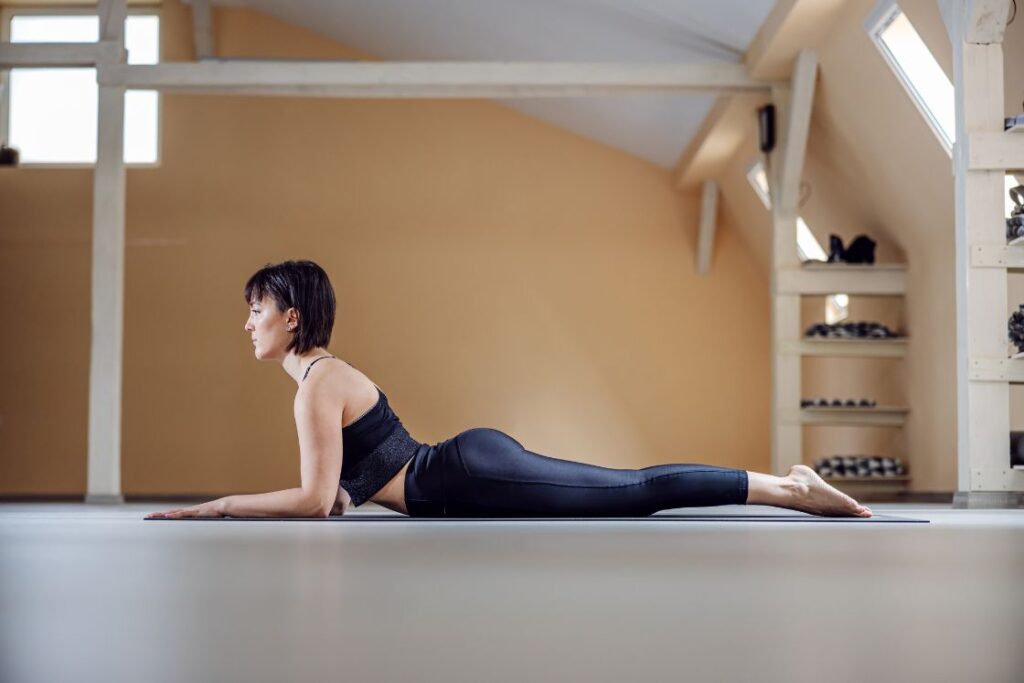
You must have seen the picture of the famous Sphinx of Egypt. This pose is a literal replication of it.
Sphinx pose helps in easing any aches in the lower back and tone the spine. Extending this further will take you to the Seal pose, which will help in a deep stretch of the stomach.
The best part of this pose is that you can perform it anytime; even while watching TV!
How to do it:
- On a yoga mat or blanket, lie down on your stomach.
- Bring your arms to the front and keep your elbows stacked below your shoulders. This will cause a slight upward tilt of your head and chest.
- You can let your forearms in the front, palms facing down, like a sphinx, or clasp your hands.
To come out of pose, slowly straighten your arms and lower your chest to the ground. Lie down with your face turned to the side and rest.
Variations
If you are unable to feel a mild compression in your lower back, you can straighten your elbows and increase the extension of the spine. This will bring you to the Seal pose, where your torso is lifted off the ground.
By placing a bolster under your armpits, you can further relax in this pose.
Use cushions under the elbows to deepen the posture and elevate the chest.
Pregnant women can place a rolled blanket or bolster under their pubic bone or thigh to get additional support.
Tilting the neck back will stimulate the thyroid glands, cervical spine, lengthen the neck and open the throat.
Contraindications
- Avoid practising this pose if you have a bad back, tight sacrum, or headache.
- In case of sharp pains in the back, ease of this pose immediately.
- Pregnant women can perform the Seal variation of this pose to reduce pressure on the abdomen. They should use bolster for more support.
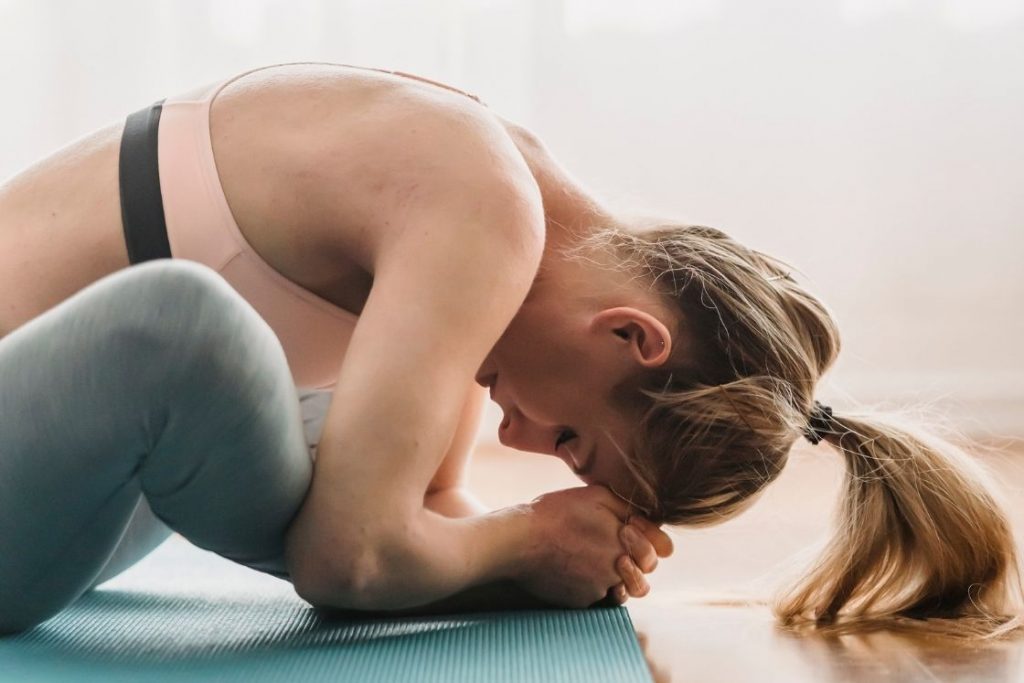
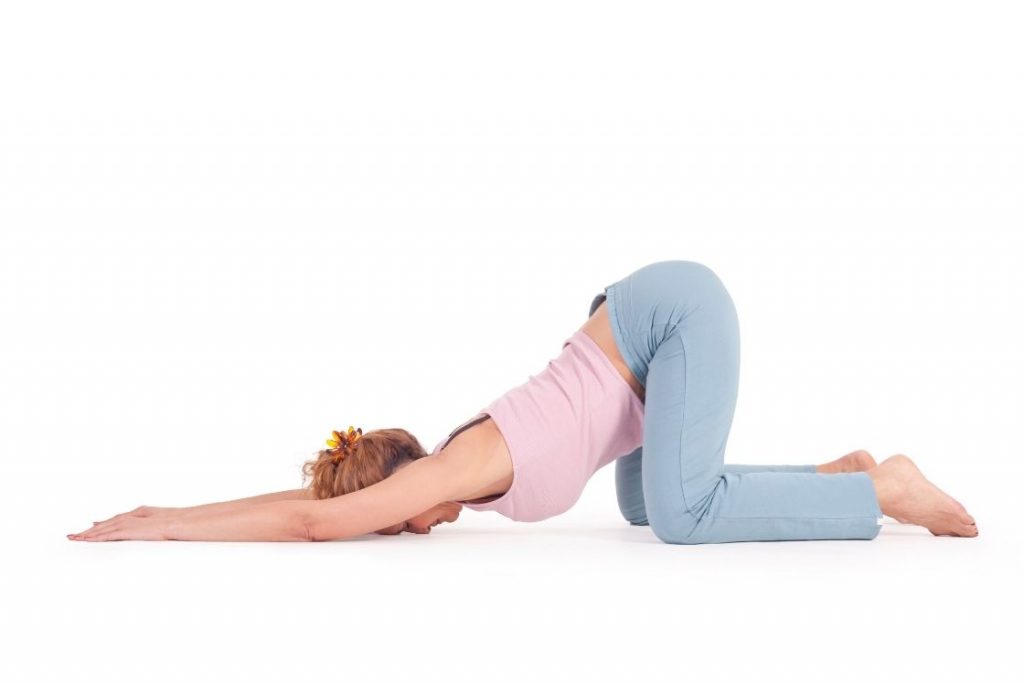
4. Child’s pose – For better sleep and healing

Just like the traditional Balasana, in yin yoga, child’s pose is extremely relaxing and healing in nature.
Child pose can be used as a counterpose for most backbend poses as it gently stretches the spine. Along with this, the compression of the chest and stomach helps with digestion.
With all this relaxing, yin child pose also improve sleep quality as it enhances circulation towards the head. It calms your mind and heart and is best for relaxing after a stressful day.
How to do it:
- Start in a tabletop position with knees below the hips and wrists under the shoulders.
- Place your butt on your heels to come to a seated kneeling position. Your knees should be closed together.
- Gently fold forward and bring your torso to touch your thighs and forehead to the ground.
- You can either place your arms at your sides or stretch them in the front.
To come out of the pose, push with your hands and roll up to sit with a straight back.
Variations
By keeping your arms stretched out in the front, you will be able to release strain in your shoulders.
If you feel discomfort in the lower belly by keeping your knees closed, you can spread them open slightly.
Keep a bolster under your chest for enhanced support and relaxation.
To support your head, you can either place them on your forearms or place a block, rolled blanket, or bolster.
For additional support to the ankles or heels, place a cushion or rolled blanket below the feet.
Contraindications
As it puts pressure on the stomach, it is better to avoid this pose if you are pregnant, or have diarrhea.
In case of knee or back injury, you should avoid practising this pose or perform with moderation using props.
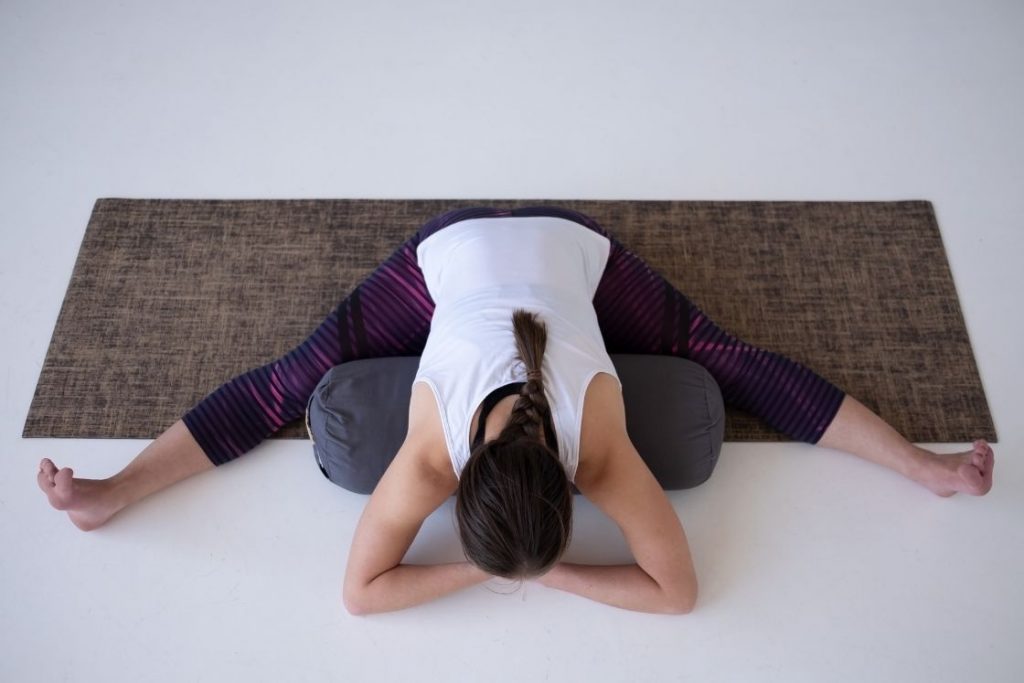
5. Melting Heart Pose – To open shoulders and soften the heart
Traditionally known as Anahatasana, this yin yoga pose is made up to clear blockages of your heart chakra.
Melting heart pose is a gentle variation of the Downward-Facing Dog pose of traditional yoga style. This pose can be easily transitioned from the Child’s pose (it looks similar to puppy pose) and can be done after performing some backend poses. It gives a nice compression to the upper back while mildly stressing the lower back.
The pose is also a great chest and heart opener. It helps in relaxing your mind and softening your heart by improving blood circulation. It is the perfect pose for people who have desk jobs.
How to do it:
- Come to the child’s pose with your knees spread apart slightly. Your hands should be stretched forward and your forehead should touch the mat.
- Gently raise your hips in a way that they are now stacked on top of your knees. Make your chest ‘melt’ to the ground.
Ease off this pose by either coming back to the child’s pose or slide forward till you are lying in your belly.
Variations
You can rest your chest on a bolster and place a blanket or cushion under your knees for support.
Instead of keeping both arms forward, bend one arm and place your head on top of the forearm.
For a deeper neck stretch, place your chin on the yoga mat or blanket and look forward. However, you should be aware of any strain that it might cause. It might also reduce the hold time of the pose.
Spread arms further apart to ease discomfort from the shoulders.
Contraindications
In case of neck problems, it is better to avoid any pose which may cause additional strain.
If you feel any tingling sensation on your arms and legs, adjust the pose or ease out of it to take some rest.
People with medical issues related to the knee, shoulder, or back should practice this pose in moderation, with props, or avoid it till they recover.
6. Caterpillar Pose – To lengthens the spine
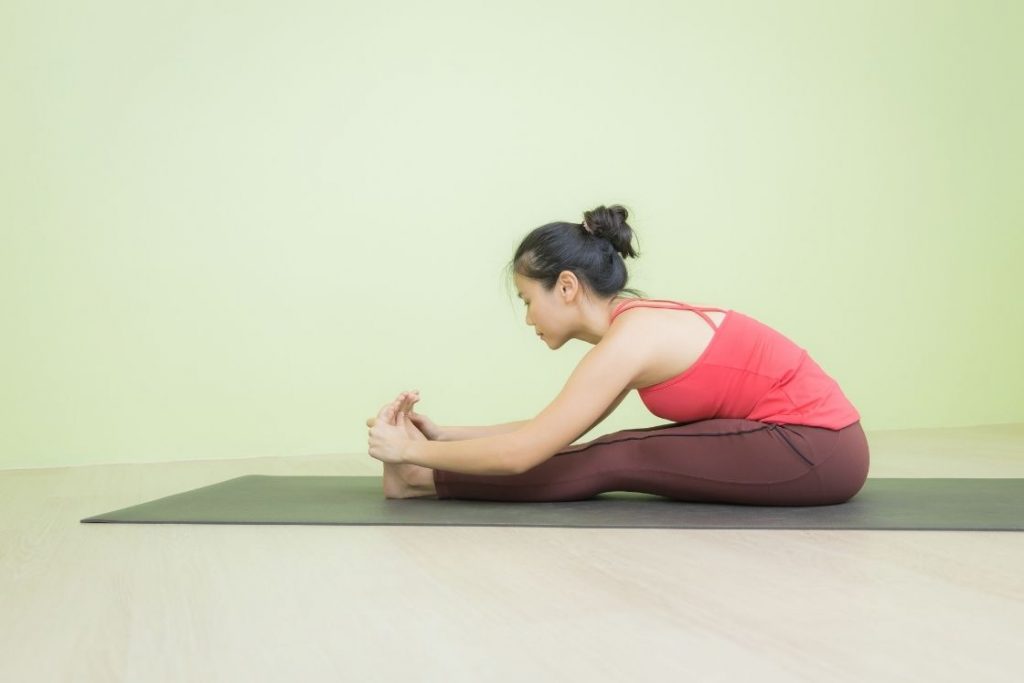
This pose is yin style of gentle forward bend which in original Hatha Yoga practiced as Paschimottanasana (Seated Forward Bend Pose).
Apart from its positive effects on the spine, the caterpillar pose also helps in relieving tight hamstrings by letting gravity work its magic. It improves digestion by compressing the stomach and stimulating the kidneys. This pose also strengthens and massages your heart.
Relaxing your nervous system also helps in calming your mind and relaxing your body. It is also a great pose that aids in sexual control and impotency.
How to do it:
Sit upright on a mat or blanket with your legs together and extended in front of you.
Fold your back by tilting your pelvis, rounding the spine. No need to bend fully. The idea is to bring the forehead towards the knees.
Keep your arms beside you or on your thighs.
To come back from the pose, push back the floor with your hand and gently roll up. Sit upright or lean back slightly to release your hips and shake your legs.
Variations
You will not be able to bend forward if you have tight hamstrings. In such a case, bend your knees and place a bolster under them. You can also sit on a cushion for added support.
Place a bolster under your chest for enhanced relaxation.
If you are feeling a strain on your neck, use your hands to support it by placing your elbows on your thighs or a cushion/bolster/blanket.
For a deeper stretch, try loosely holding your toes with your fingers.
Contraindications
If you are suffering from sciatica, either avoid practicing this pose or use a cushion to elevate your hips enough that your knees are below the hips.
Avoid practicing this pose if you are recovering from an injury in the lower back, which restricts you from working with your spine.
7. Straddle or Dragonfly pose – To open inner knees, groin and back of the thighs
This is another yin style pose that is a great hip and pelvis opener. Along with a gentle opening of the inner knees, it stretches your groin and the back of the thighs. For females, this pose is beneficial as it will ease childbirth and improve the function of the ovaries.
Additionally, your back is also getting a significant stretch which will help in easing any aches.
How to do it:
- Sit on a yoga mat or blanket with legs extended forward.
- Spread your legs apart as far as you can.
- Bend forward while keeping some weight on your hands by keeping them straight in front of you or on the elbows.
- Ease off this pose by using your hand to push up your upper body. Lean back slightly to ease the hips and either drag or lift your legs to bring them together.
Variations
For a deeper hamstring and spinal stretch, fold over one leg and then the other.
Place a bolster under the thighs in case your hamstrings are too tight.
To elevate your hips use a bolster or a cushion.
A bolster can be placed under the chest to support your back. Similarly, use a block under your elbow for support if you are supporting your head with your hands.
Bend your knees if you are feeling stiff as it will help in the forward fold.
For advanced practitioners, you can test your flexibility by bending forward completely so that your entire upper body is touching the ground. You can also try doing a full 180-degree split.
Further, you can fold over one leg and twist your torso towards the sky.
Contraindications
If you are suffering from sciatica, either avoid practicing this pose or use a cushion to elevate your hips enough that your knees are below the hips.
Avoid practicing this pose if you are recovering from an injury in the lower back, which restricts you from working with your spine.
Pregnant ladies should practice this pose with caution as pressure on the abdomen can cause discomfort.
8. Happy Baby Pose – Benefits the hips, biceps, and stomach
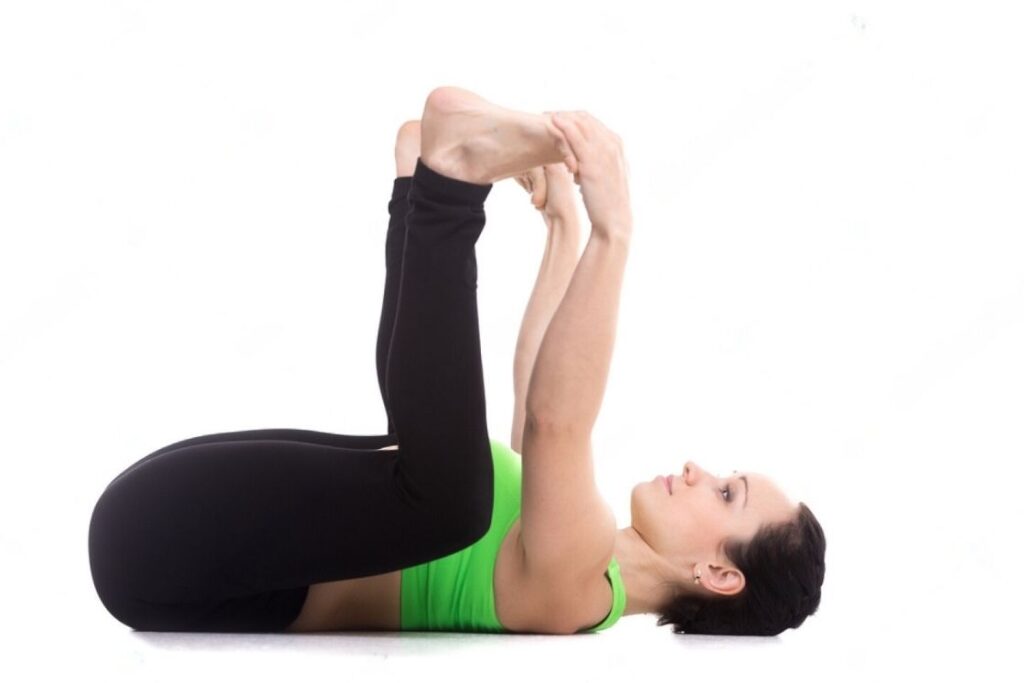
Also known as ananda balasana in traditional yoga, this yin yoga pose imitates a happy baby who stretches his arms and legs towards the sky and sometimes even holds the feet.
When you practice this pose, you are compressing your stomach which improves digestion, opens the hips and releases stress, and strengthens your biceps as you use your arms to pull the legs.
How to do it:
- Lie down on your back and bring your knees up to your chest. The lower part of the leg should point towards the sky.
- Grab your soles, ankles, or the back of your legs.
- Slowly start spreading your feet apart, taking your knees with you. Your feet should now be above your knees and the knees should be pushed towards the floor alongside your chest.
- Keep your back straight, head down and shoulders relaxed.
Ease out of this pose by removing your hands from the feet, and bringing your legs down to the ground by bending your knees. Stay in this position for a few seconds before you start with another.
Variations
Instead of bending both legs, you can keep one leg straightened and hold the sole of one foot. This is known as the Half Happy Baby pose.
You can use a strap to hold your feet if you have stiff shoulders. Or hold the back of the thighs.
If you’re a beginner, keep your toes together and near the groin. You can spread your legs when you feel ready.
Instead of actively engaging your arms to pull the legs, let gravity do the work for you to pull the knees down.
While pulling the legs, you can try curving your tailbone for an enhanced stretch in the lower back.
Advanced practitioners can try to straighten their legs while pulling the knees to the ground. However, make sure that your hips are not lifted up.
Contraindications
For females who are on their periods or are pregnant, it is better to avoid this pose.
People suffering from high blood pressure should either do this pose in moderation or avoid it completely.
If you have a medical issue pertaining to the lower back, hip, pelvis, thighs, or shoulders, discuss with your doctor and instructor before practicing the pose.
9. Reclining Twist – Restores equilibrium
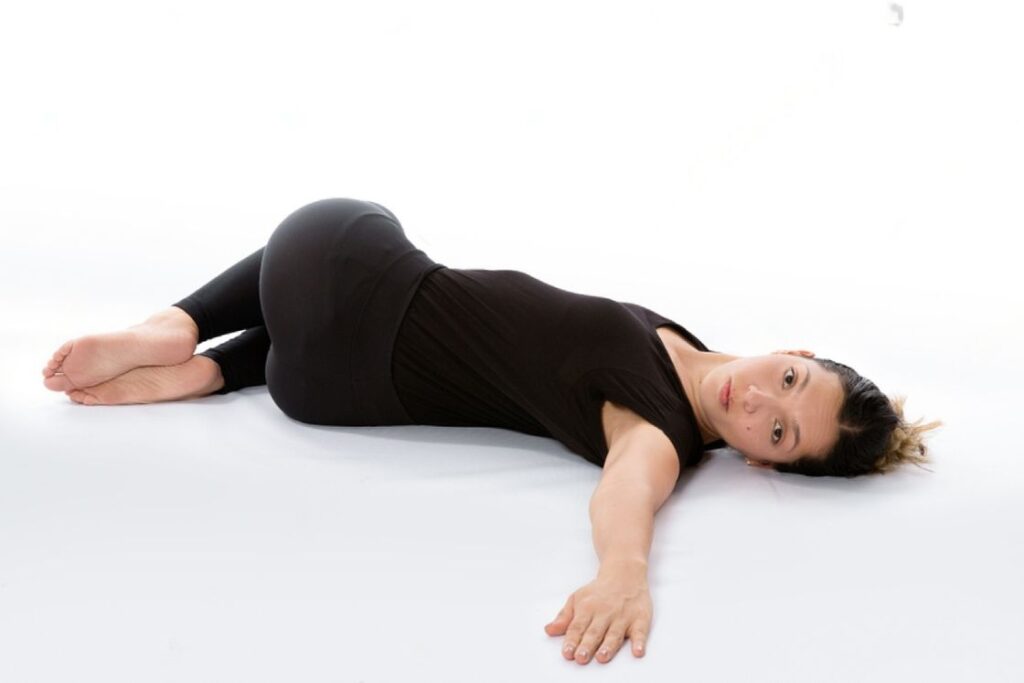
Reclining twist is often performed towards the end of yin yoga session.
The twist helps in stretching the lower back and releases tension from the spine. It also works on the nervous system which helps in relaxing the body and brings about a balance. The bent knee can also help people suffering from sciatica.
This is also one of the poses which work on almost all the organs of the body through various variations.
How to do it:
- Lie completely on your back and bring your knees to the chest.
- Drop both knees to one side and create a twist-like pose in the lower half of your body.
- You can spread your arms on the sides or bring them overhead.
To come out of this pose, gently bring your knees to your chest and place your feet onto the floor.
Variations
Try keeping your head on either side to feel different stretches and sensations.
Experiment with bringing your knees closer and further to the chest in the twist. With knees closer to the chest, you are targeting the upper back and by keeping them further, you are working on your lower back.
If you have a history of getting a tingling sensation when you stretch your arms overhead or spread them, it is better to keep your arms resting on your side or on your chest. For more support, use a bolster from support.
Advanced practitioners can bring one knee closer to the chest and hold that knee with the opposite hand to bring it across the body. Keep your shoulder blades on the floor. Use a bolster to support the knees and spine and a cushion for the shoulder blades.
Another advanced variation can be to stretch the top leg out to the side. It helps in keeping the hips fully turned.
Contraindications
People with medical issues related to hips, spine, pelvis, shoulder, knees, neck should practice this pose with caution or avoid it till they are recovered.
Pregnant ladies should also be cautious while performing the twist as it may cause discomfort in the abdomen area.
10. Savasana – For relaxation
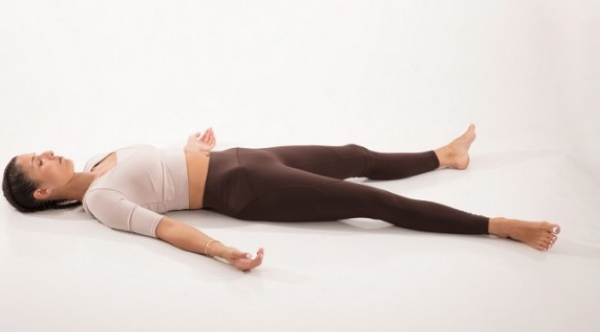
This is one yin yoga pose that has its name similar to the traditional yoga style. The corpse pose is performed at the end of the class to let the body absorb all the sensations of the poses and let your mind relax. So it doesn’t come as a surprise that most students fall asleep during this pose.
You need to remain still and aware in this state to observe the flow of Chi or prana from the various joints or body parts. You can place a blanket on top of you for extra warmth.
While you simply have to lie down on your back, there are a lot of variations that can help you completely relax and surrender your mind.
How to do it:
Lie completely on your back and close your eyes. Get aware of the sensation within your body and allow all your organs, mind, bones, muscles, joints to get relaxed. Keep your breathing stable with one or two sighs here and there.
When you have to come out of this pose, start by taking deep and long breaths. Move your fingers, toes, and head to stimulate the flow of energy. Slowly bring your knees to the chest and make yourself as small as you can, just like a fetus.
Exhale and squeeze your knees to the chest and bring your head as close as possible to the knees. Stretch your entire body as if you were waking from a fulfilling sleep.
Variations
Hands – Keep them spread to the side like a star, bend your elbows so that your hands rest beside your ears, arms stay by your side, put them on top of the chest with one palm on top of the other, or keep them stretched overhead.
Legs – Keep them straight together, spread the legs hip-width apart, bend your knees slightly for resting the lower back to the ground, or keep the feet pointed up or fall outwards. In case you are bending your knees, use a bolster under them for enhanced support.
Common mistakes to avoid in Yin Yoga practice
While performing the poses, keep the following points in mind to avoid injury and pain.
Using props doesn’t mean that your body is immune to experiencing pain. Awareness is key in identifying when you have gone too far. If you have lingered in a pose or have been feeling discomfort, it is better to back off and take a rest.
Never push yourself past the edge. You may think that just because you have to retain a pose for 3 minutes, you will be bearing the pain for that entire duration. Even if your start feeling pain within 30 seconds of getting into the pose, ease from the pose and let your instructor know.
Do not forget to breathe. It is quite a common occurrence that in order to perfect the pose or holding pose for longer, practitioners often forget to take deep belly breaths. The breathwork is also an essential factor in yin yoga making you comfortable and getting into the right mindset. You will be able to hold the pose for however long you want if you are aware of your breathing.
The gentle rhythm of getting into the pose should be the same while getting out of the pose. Do not make unnecessary movements to cause muscle spasms or tissue injury.
No heavy meals 2-3 hours before the Yin Yoga session. Also, empty your bowels for lesser interruptions during the session.
Make sure that you have sufficient time after the yin yoga session. You should not be in a hurry to complete the session to attend to your schedule. Yin Yoga is meant for relaxation, so have sufficient time in your hand to be at ease.
Wear clothes that are comfortable and will not hinder your movement. Even if you are layering up, they should be non-restrictive yet breathable. Also, avoid strong scented perfume. You do not want to cause a headache in a relaxing session.
Yin Yoga is not restorative. If you have an injury anywhere in your body, especially in your arms, legs, and back, consult a doctor and a Yin Yoga expert before signing up for a class.
Conclusion
The Yin Yoga style is for everybody. Even if you do not practice yoga and workout in the gym, you can still make this a part of your routine to focus on tissues. With the use of props, you can relax your mind and body and avoid any strain on your muscles and fascia.
With regular practice you will be able to hold positions for a longer duration and can also modify them as per your preference. Imbibe this style to attain an overall health, from muscles to the joints, which are often ignored.
FAQs Yin Yoga
Yes, Yin Yoga is accessible for beginners. The long holds provide an opportunity to ease into postures, and modifications can be made to accommodate various fitness levels.
Poses in Yin Yoga are typically held for 3 to 5 minutes, allowing for a deep stretch and stimulation of connective tissues. Advanced practitioners may hold poses for even longer.
Yin Yoga is a slow-paced practice that involves holding postures for extended periods, targeting connective tissues. Its focus on stillness sets it apart from more dynamic yoga styles.
Yin Yoga offers benefits such as increased flexibility, improved joint mobility, stress reduction, and enhanced energy flow throughout the body.
Yin Yoga is characterized by long-held, passive postures targeting connective tissues, fostering flexibility, and relaxation. Vinyasa Yoga, in contrast, is a dynamic practice linking breath with movement, focusing on building strength, flexibility, and fluidity.

: Meaning, Steps, Contraindications & Benefits")


