B.K.S. Iyengar was a pioneer in the use of yoga props. Today yoga props are widely used to correct alignment, deepen the poses and support individuals working on their strength & flexibility. He urged students to utilize modified props as tools to help them with their yoga practice.
Amongst the various props that he originally used, such as ropes, bolster, and wooden blocks, a chair was also instrumental in getting the yoga practitioners into the desired pose.
In today’s time, a yoga chair can be seen in yoga studios or most yoga practitioners’ households. Practicing certain poses with a chair can stabilize the movement and help to relieve aches while also increasing strength and mobility.
Including a chair in your routine adds extra support, allowing you to perform simple stretches and improve your overall health.
In this article, we will discuss ways to use a yoga chair and how it can aid your yoga practice.
What is a yoga chair?
A yoga chair is a modified form of a traditional folding metal chair that is extremely durable and sturdy. They don’t have some empty space in the back so practitioners can easily put legs through the chair’s back, allowing them to accomplish a variety of poses. Yoga chairs are made of smooth tubular steel and are said to support your entire body weight easily.
The forward slant of the front legs makes them very stable and versatile to use. It can easily be utilized open or folded based on the kind of support you need in your poses.
And any modified yoga asanas performed with the help of a chair is known as chair yoga.
To practice chair yoga, it is not mandatory to buy this specialized chair. You can use any chair available at your home provided it doesn’t have wheels as they do not give stability.
A yoga chair is most often used for:
- Support – by using the back of the chair, the edge of the seat, or even the legs
- Stability – by reducing the fear of falling in balancing poses
- Resistance and extension – to give the extra stretch in twisting or bending poses
- Relaxation – by letting the head, arms and legs rest on various parts of the chair
- Rehabilitation – by aiding in supporting your body during recovery from illness, injury, surgery, etc.
Also, a chair is an excellent prop for anyone who is disabled, has mobility restrictions, or wishes to take a more therapeutic approach to their practice. It also aids people above certain ages, are overweight, office workers, and individuals with neurological, cardiovascular, or skeletal ailments.
When you feel confident and ready, you can take the chair out of most poses and move through the exercises in a normal fashion.
Benefits of using yoga chair
Practicing yoga on a chair is not much different than performing it without any prop. The benefits that you would get while practicing traditional yoga on the floor can be achieved through chair yoga as well. However, using a chair can be of immense help to a beginner in improving their flexibility, strength, stability, and building confidence. A chair can help in preparing you for more advanced poses by making you understand the limitations of your body.
Below, we have described some benefits of using a chair in your yoga practice:
It is an easily accessible prop
A chair is available in every household, which makes it easy to obtain and use as per the availability. As long as the chair is sturdy, strong, comfortable, and fulfills your requirements, you can use the chair for many backbends, twisting, and balancing poses. Even if you have armrests in them, they can come in handy when you have practice twists and require you to hold onto something.
Chair can help you slow down
Slowing down doesn’t mean performing yoga poses at a slow pace. It means to bring about awareness about your body with movement and controlled breathing. As the chair gives you a confined space to work with, you’ll learn to train your brain to concentrate more on your body as you take deep breaths and slow down your movements. It builds a powerful connection between the mind and the body and a stronger sense of identity.
Aids in correcting your posture
One of the best ways to improve your posture is to sit on a chair with a straight spine and your feet firmly grounded on the floor. To correct your slouch, sit on the edge of the chair seat and be conscious of the way your back feels. Even with the help of the chair’s backrest, you can focus on just sitting straight with your head aligned.
Allows you to go beyond bodily restrictions
By using a chair, you can easily reach your toes in a forward bend pose. You will easily be able to twist your upper body while bracing the back of the chair or the armrest. Also, since you are no longer standing, the pressure on your knees will significantly reduce. These are only some of the ways that a chair can help you go beyond the body limitations that you would have been unable to while practicing yoga normally.
Enhances your flexibility and strength
Chair yoga is a great approach to building strength whilst being compassionate to your body. All of the stabilizing muscles that we utilize every day, such as muscles and tendons surrounding the ankles, shoulders, and hips are strengthened by practicing yoga on a chair. Also, by enabling to easily twist and bend forward and backward, it will help improve flexibility for beginner and seasoned practitioners alike. All of this combined improves your stability, balance, and mobility.
It takes up less space
More often than not, you may not find enough space to spread out a yoga mat or a blanket to begin your yoga session, especially in your home. You can easily pull up a chair and modify the poses in a way that you can perform almost all of your poses. Moreover, office workers can also practice some simple yoga poses on their chairs while not having to worry about searching for a dedicated space.
Encourages restorative practice
One of the basic principles of restorative yoga is to hold poses longer than traditional yoga forms and a chair can be of huge help. Since you are modifying the poses, it will become easier for your to hold poses for a longer duration. It will encourage you to let go of your weight in the chair and completely relax. A chair can help you practice poses during your phase of recovery from any illness or injury as well.
8 yoga poses to try with a chair
Now that you know the immense support a chair can provide to your practice, here are 8 poses that you can try practicing with a chair. You can practice these poses whenever you feel that you need a time-out from the traditional yoga sessions.
1. Tree Pose
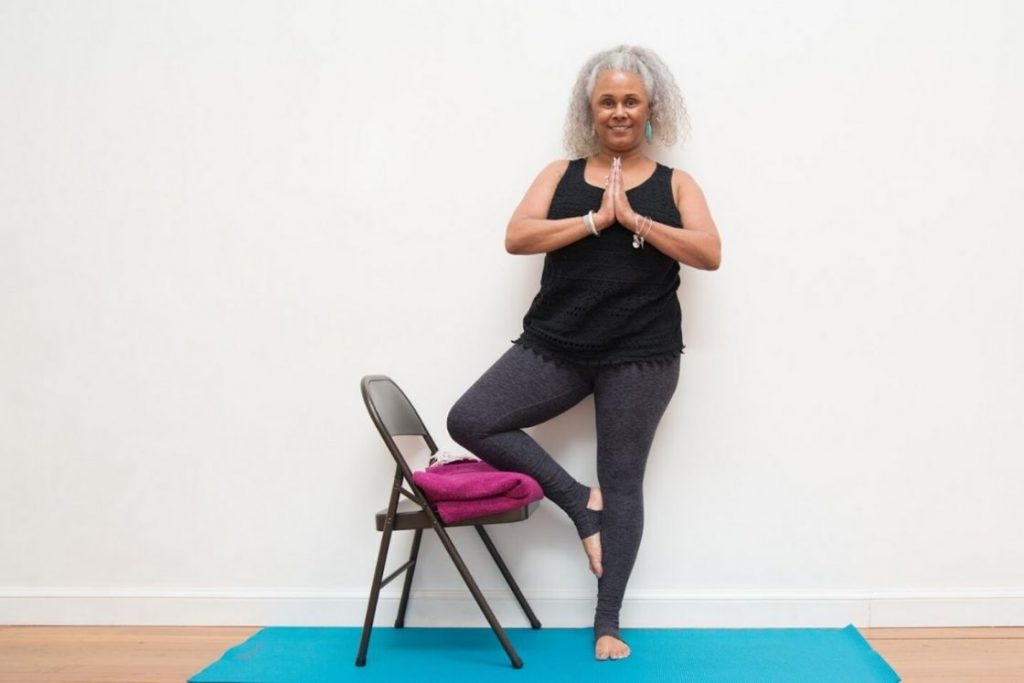
Tree pose is touted to be one of the most beneficial poses to correct your posture and alignment of the spine. It is difficult for most people to balance on one leg and a chair can help you practice this pose without worrying about maintaining a balance.
- Stand sideways in front of the chair.
- Begin by lifting up the right foot, as you would while performing the pose in a normal situation.
- Keep the bent right knee on the seat of the chair and place the sole of the feet on the lower left leg.
- Place a folded blanket or towel on the seat to give padding to the lower right leg.
- You can keep your hands in the Anjali mudra in front of your chest or extend them overhead and join the palms.
- Hold this pose for 3-5 breaths and repeat with the other leg.
If you cannot continue with the intense bend of the leg, you can also place the right leg foot on top of the seat of the chair. The lifted leg will be making a 90-degree and the other leg will be kept straight.
2. Downward Facing Dog Pose
Using a chair to perform the asana can assist you to move your body weight from your arms to your legs, allowing you to stay in the position for longer. It will uniformly, appropriately, and fully extend the body, increasing strength and length without hurting the shoulders. It also helps during times of dizziness, sensitive wrists, balancing problems, and weakness.
Downward-facing dog pose can be performed in several ways with a chair.
Variation 1
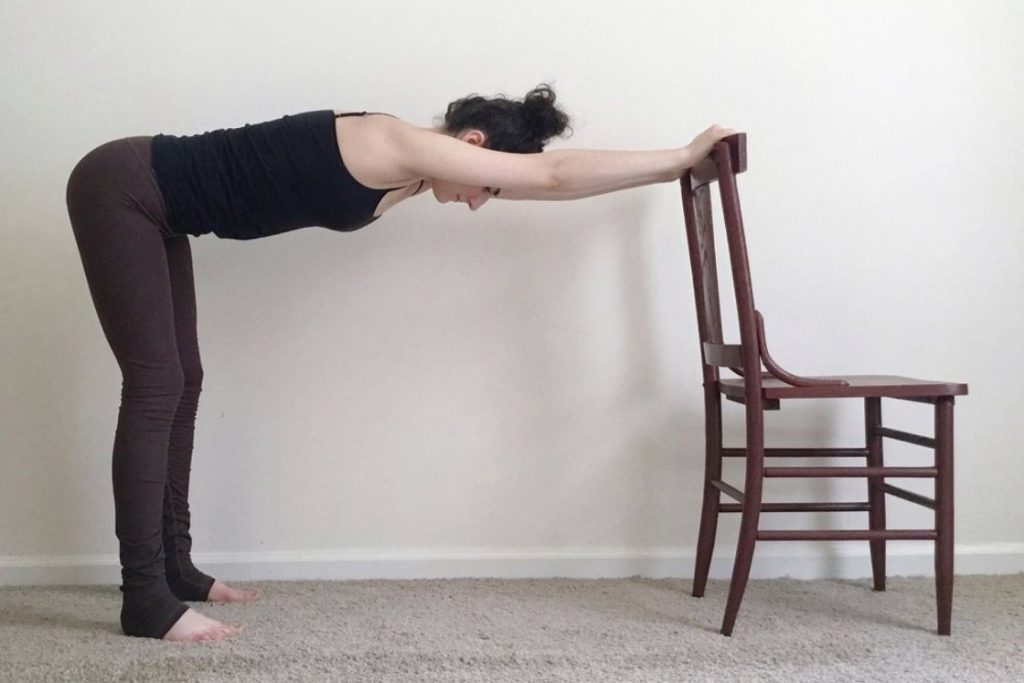
- Stand in front of the chair facing the chair’s back.
- Keep your legs hip-width apart and bend forward from the hips.
- Hold the back of the chair with your arms and bend till your upper body is parallel to the ground.
Variation 2
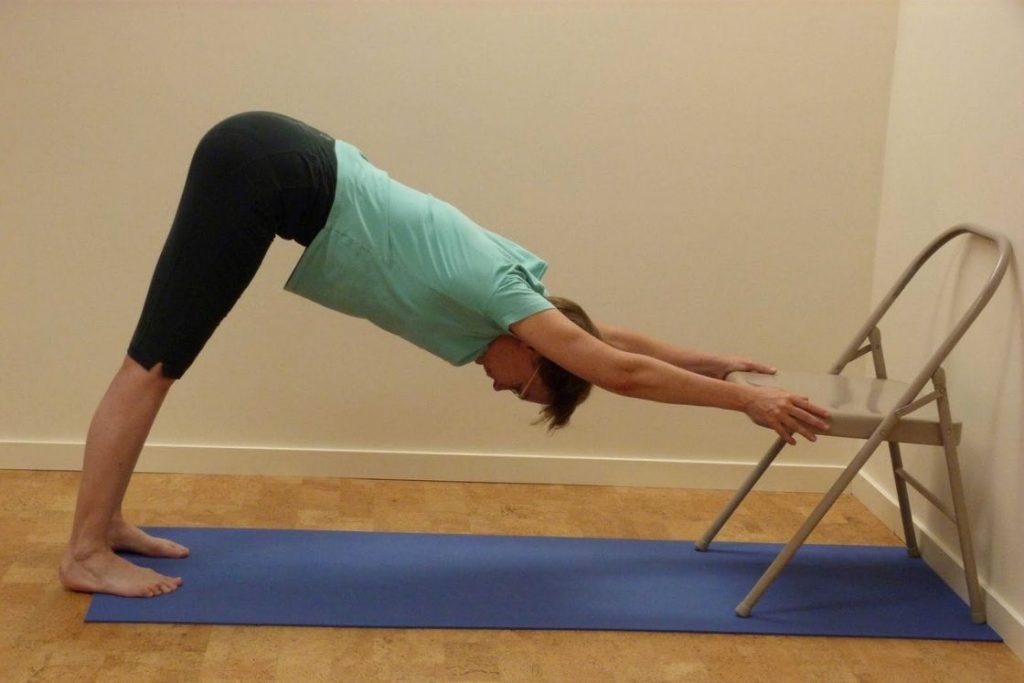
- Place the chair against wall. Stand in front of the chair facing the chair’s seat.
- With your legs hip-width apart, bend forward from the hips and hold the sides of the seat.
- Find your balance in this pose and walk your legs back approximately 3-4 feet.
- You can also place your forearms on the seat and rest your forehead for a more restorative approch.
- Make sure that your feet are in line with your hands.
In each of the above poses, you can hold them for 5-7 breaths or as long as you can.
3. Eagle Pose

Eagle pose is an intermediate to advanced balancing pose which can be made easy with a chair. You will be effectively reducing the rotation of the pelvis and torso by staying seated. It is a wonderful modification who are experiencing tight hips, hamstrings, quads, and knee issues.
- Sit on the chair with your back straight.
- Bring your right leg over the side of the left leg so that the knees are almost on top of each other. If you’re flexible enough, try crossing the right foot under the left calf.
- Extend your arms in front of your chest. Keep your right arm on top of your left so that the elbows are stacked on top of each other.
- Bend the arms so they are at a 90-degree angle. Try holding the right palm with your left and fingers pointed straight towards the ceiling.
- Hold this pose for 5-7 breaths and repeat with the other leg and arm.
4. Warrior I Pose
In warrior 1 pose, a chair will assist in keeping the weight in the center of the body. It allows you to stay in the position for longer and work on stretching your back leg and hip. Concentrate on maintaining your spine erect and centered in this seated version.
Before starting the pose, you can place a folded blanket on the chair seat for more comfort, if the seat is not already padded. A small folded towel can also be placed under the foot that has been extended back.
- Starting from the right side, sit on the chair sideways so that the right side of your torso is facing the back of the chair.
- Hold the back of the chair and take your left leg 3-4 feet towards the back keeping a slight bend in the knee.
- Your left foot will be placed almost vertical with the balls of the feet placed in the ground.
- Your right thigh should be parallel to the ground and make a 90-degree angle. Your right knee should not go forward than your toes.
- When you’re stable in this pose, extend your arms upwards keeping the shoulders away from the ears.
- Stay in this pose for 3-5 breaths and slowly come back to the original position.
- Repeat with the other leg.
5. Warrior II Pose
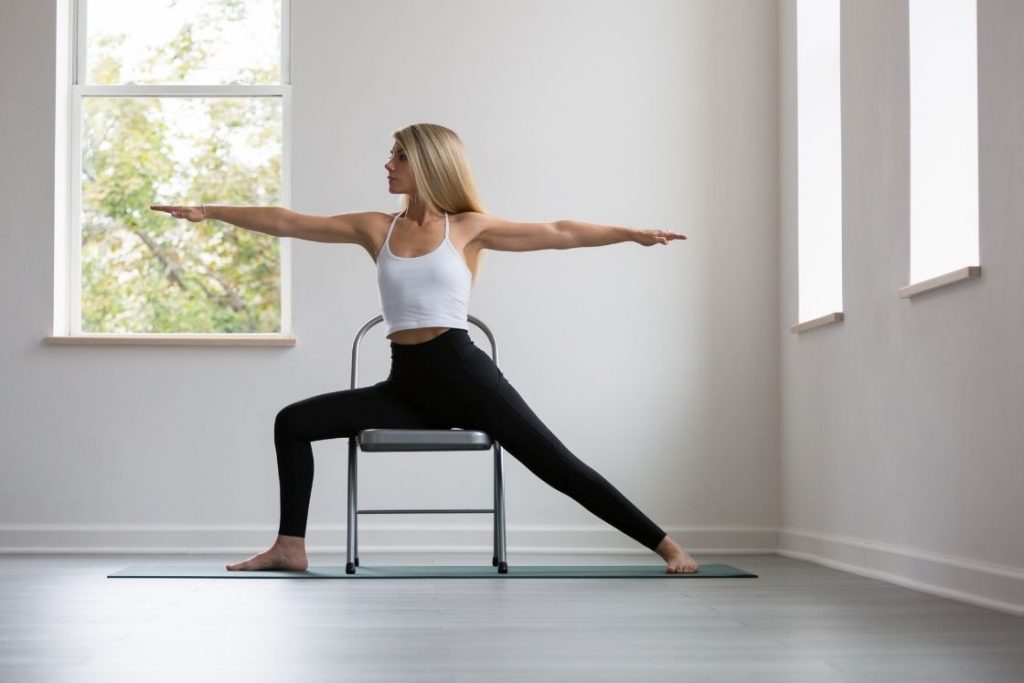
The warrior II pose is just another extension of the warrior I pose, where you also turn your body sideways. By being seated on the chair, you are controlling the rotation of the hips as well as the opening of the groin. It also helps in keeping a steady balance when extending the arms.
- Starting from the right side, sit in the chair sideways so that the right side of your torso is facing the back of the chair.
- Hold the back of the chair and take your left leg 3-4 feet towards the back keeping a slight bend in the knee.
- Your left foot will be placed almost vertical with the balls of the feet placed in the ground.
- Your right thigh should be parallel to the ground and make a 90-degree angle. Your right knee should not go forward than your toes.
- Extend your arms to the sides and turn your upper body, except your head, to face completely opposite from the backrest of the chair.
- Make sure your shoulders are away from your ears and the arms form a straight line, parallel to the ground.
- Stay in this pose for 3-5 breaths and slowly come back to the original position.
- Repeat with the other leg.
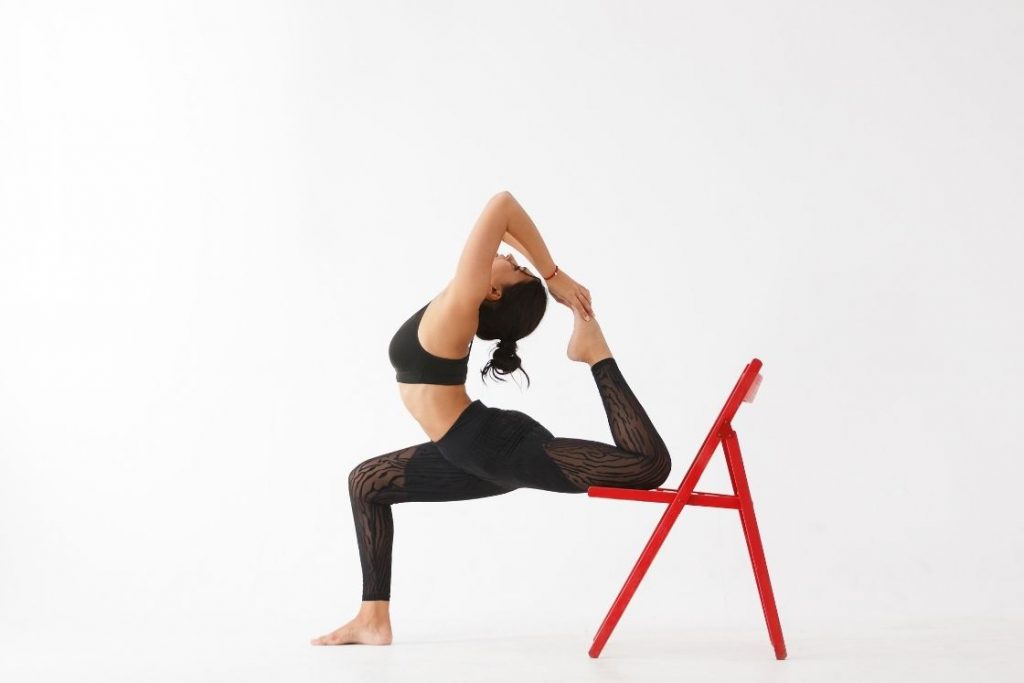
6. Pigeon Pose
Even while seated on the chair, practicing pigeon pose will give you the same benefits as it would while performing it on the floor. Pigeon pose on chair better stretch your quads and hamstrings, open your hips, improve your digestive system and additionally stretch your glutes.
- Sit on the chair with your spine straight and legs hip-width apart.
- Externally rotating your hip joints, bring your left foot up and place it on the right thigh, slightly above the knees.
- Keep your hands on the knees, palms facing down.
- Hold the pose for 3-5 breaths.
- To go deeper into this modified pose, bend forward till you are able to lay your torso on the lifted leg. You can also keep a cushion or a bolster if you want to make it restorative.
- Repeat with the other leg.
You can also challenge yourself by practicing this pose while half standing and resting the bent leg on the seat of the chair. Your front leg will be placed on the seat of the chair while the other leg will be stretched behind.
7. Seated Spinal Twist
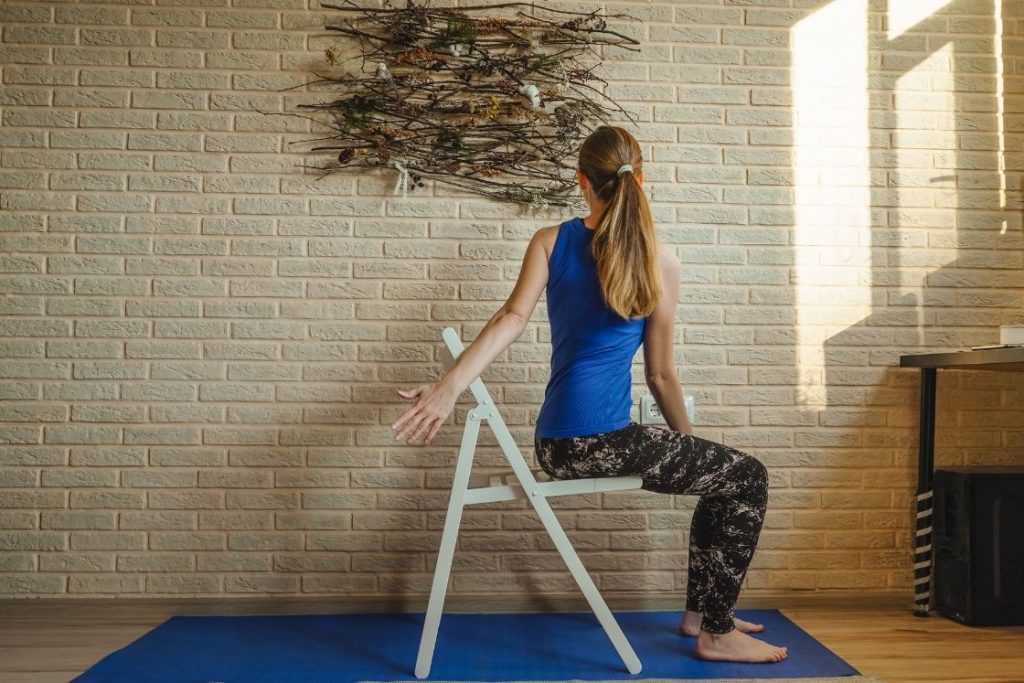
When compared to practicing on the floor, using the chair allows you to achieve better alignment, extension, and twist along the spine. It will increase back, neck, and shoulder flexibility without decompressing the spine.
- Sit on the chair sideways with your right side against the backrest and your hands on the backrest.
- Sit with a straight and tall spine.
- Gently twist to the right with your spine stretched. Move your entire torso, instead of just your back, and place your right arm on the chair’s back.
- Make sure that while twisting, the left hip should not lift up.
- Keep your gaze over your right shoulder and hold for 5-7 breaths.
- Return to the starting position and repeat on the left side.
8. Goddess Pose
The goddess pose is a wonderful hip opener that also tests your strength and stability. By stretching your legs wide, you are also targeting the various thigh muscles. Your knees and ankles also get strengthened in this pose. Using a chair will give you much-needed support in surrendering to the pose without the fear of losing balance.
- Sit on the chair, slightly away from the backrest, with a straight spine and legs hip-width apart. If your chair doesn’t have a padded seat, use a folded blanket or a towel.
- With your back straight, spread your legs to the side, as far as you can go based on your flexibility. The ideal position would be to spread the legs so much that it forms a straight line from one knee to the other.
- Your feet should also be pointing in the same direction as the knee.
- Keep your forearms on the thighs with palms facing up.
- Hold this pose for 5-7 breaths.
Another variation of this seated version is to extend one arm overhead, say the right arm while keeping the left forearm on the left thigh. Tilt slightly towards the left to turn your head and gaze at the right-hand fingers. You can tilt more to increase the stretch in the right side of the upper body.
Conclusion
Anyone who struggles with balance, strength, or flexibility can benefit from practicing yoga with a chair. It can assist you to practice a variety of asanas regardless of your degree of physical fitness, shape, or mobility. Including a chair in your yoga practice provides additional support, allowing you to accomplish basic stretches and improve your general health.
: How to Do & Benefits")

: Steps, Benefits & Precautions")

