- Importance
- 7 Hip opening poses
- Butterfly Pose
- Happy Baby Pose
- Low Lunge
- Frog Pose
- Firelog Pose
- Garland Pose
- Hero Pose
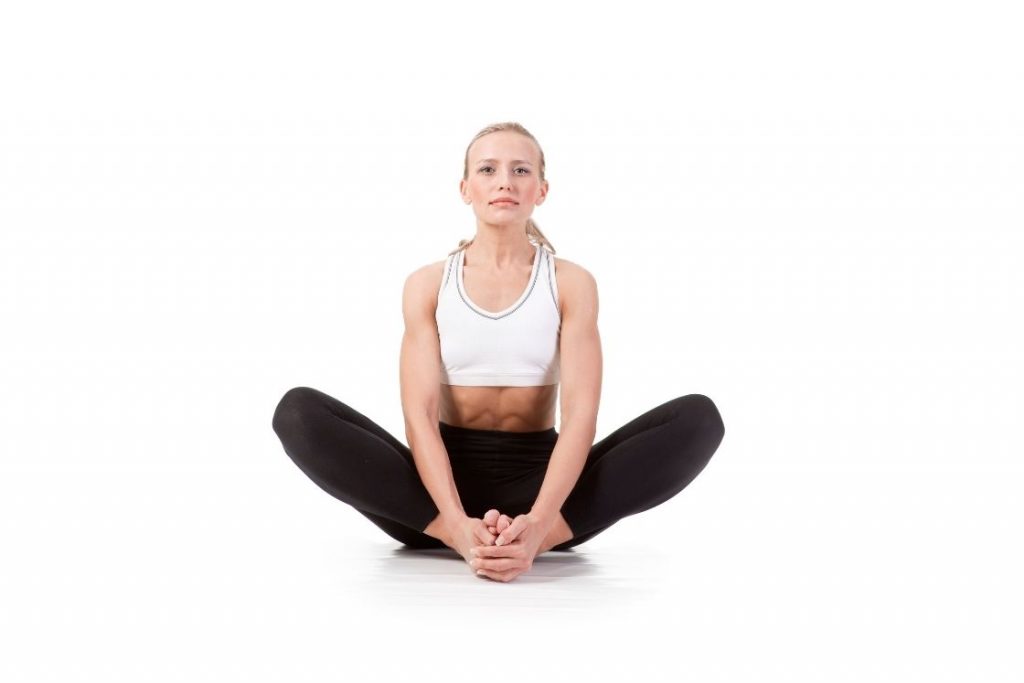
- Benefits
Our current lifestyle has forced us to sit for long hours in front of our laptops, be it work from home or in the office. Also, we commute while sitting in our car or public transport, we do exercises in the gym while sitting, even if we are looking at our phones, we are either sitting on a sofa or our beds. Sitting for long hours has become second nature to us.
All this can cause a restriction in mobility and flexibility in the hip joints. Often referred to as tightness in the hips, you will feel a strain or pain when you walk, stand for a few minutes, or want to sit.
Spiritually speaking, when hips are blocked, you also experience blockages in your Sacral Chakra or the Svadhisthana to emotional or physical imbalances.
It is also said that the after-effects of emotional traumas or stress get accumulated in the hip which can also lead to tension and tightness in the hips.
To resolve all of the above issues, practising hip-opening poses during your yoga session becomes the need of the hour.
Why hip opening poses are important to practice?
While it may seem that the tightness and tension in the hips go away after you perform a few stretches in between your work or daily schedule, the problem is still quite deep-rooted. This stress basically occurs in the ball and socket joint of the hips which gives a range of mobility.
This area takes the most brunt as it supports your weight, helps in walking, maintaining posture, and balancing. A lack of flexibility and mobility in the joint can lead to pain, cramps, and long-term ailments such as disfigured posture, lower back pain, spinal misalignment, etc. Hip opening yoga poses focus on such areas to release tension from the muscles and joints. These poses can be performed while sitting, standing, or in a reclining position.
Apart from working specifically on the hip areas, most of the hip opening poses also stretch your hamstrings, quads, lower back, groin, and knees. All of these areas are interconnected in some or another way and strengthening them will give you a confident stride.
If you are experiencing pain in any of these areas, the poses will help you get relief from it and also increase your flexibility.
Additionally, pregnant women can greatly benefit from such poses as it will help during their childbirth and also release the pressure due to their swollen belly.
7 Hip Opening Yoga Poses
We have listed beginner-friendly hip-opening poses that will aid you in better movement, flexibility, and balance along with strengthening the hip muscles and joints.
If you have any injury, severe pain, or have undergone surgery on the spine, knee, or hip, be careful while performing these poses. It is better to avoid them or practice them in consultation with your doctor. Pregnant ladies can practice some of these poses with the help of props such as blocks, cushions, blankets, bolsters, etc to reduce pressure on their belly.
Many of the below poses can be turned into a more restorative version by using props as support for your knees, back, hips, and neck.
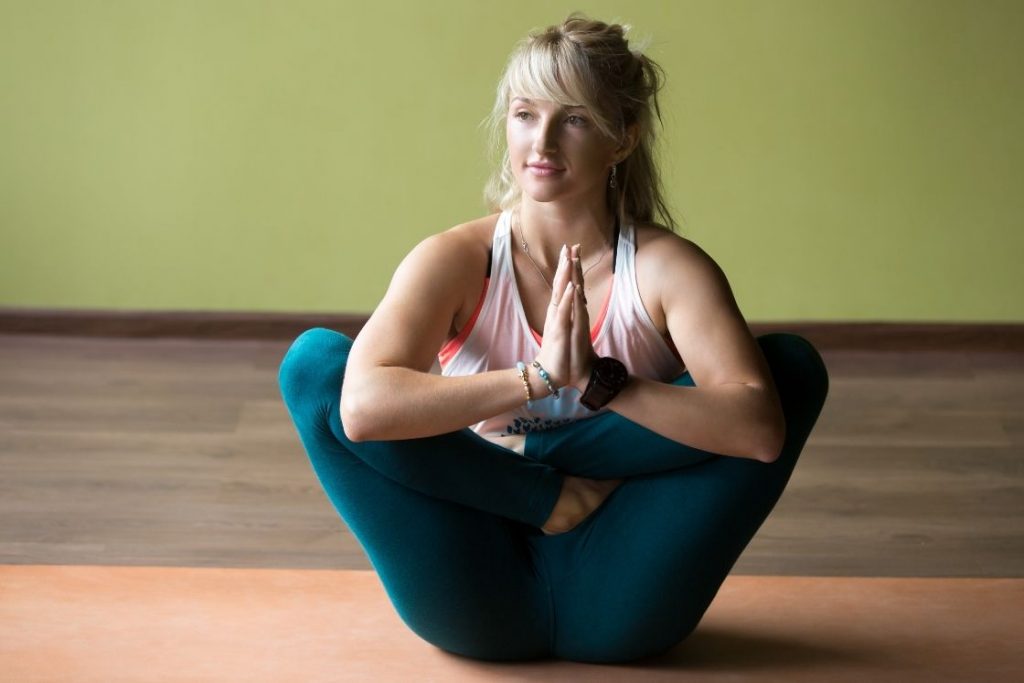
1. Butterfly Pose (Baddha Konasana)
Butterfly pose gives you a good warm-up movement to start a hip-opening yoga sequence. When you are performing the butterfly pose, you can be assured that you are working on the entire hip area. It also promotes stretching of the inner thighs and back muscles. This pose will help you in increasing flexibility, mobility, and reducing pain.
Pregnant ladies can also practice this pose with a lot of props.
- Sit in Dandasana (Staff pose) with spine straight and legs stretched comfortably. You can also practice the pose by supporting your back with a wall to keep your back straight. To add more cushion, you can sit on a folded blanket.
- Relax your breath and start to bend your knees with the soles of both feet turned towards each other.
- Bring your feet as close to your groin as possible, depending on your hip tightness and flexibility. Make sure you are not experiencing any strain or discomfort in your thighs, groin, hips, and lower back.
- In case of any discomfort, increase the distance between the feet and groin to ease the pain and work towards decreasing that gap gradually.
- Keep your legs relaxed so that your knees are close to the ground, if possible. If you feel a strain, keep a block or cushion under each knee for support.
- Hold your feet with your hands at the ankle or your toes. Your spine should not curve/bend while holding your feet.
Stay in this pose for 3-5 breathes or as long as you can hold the pose.
2. Happy Baby Pose (Ananda Balasana)
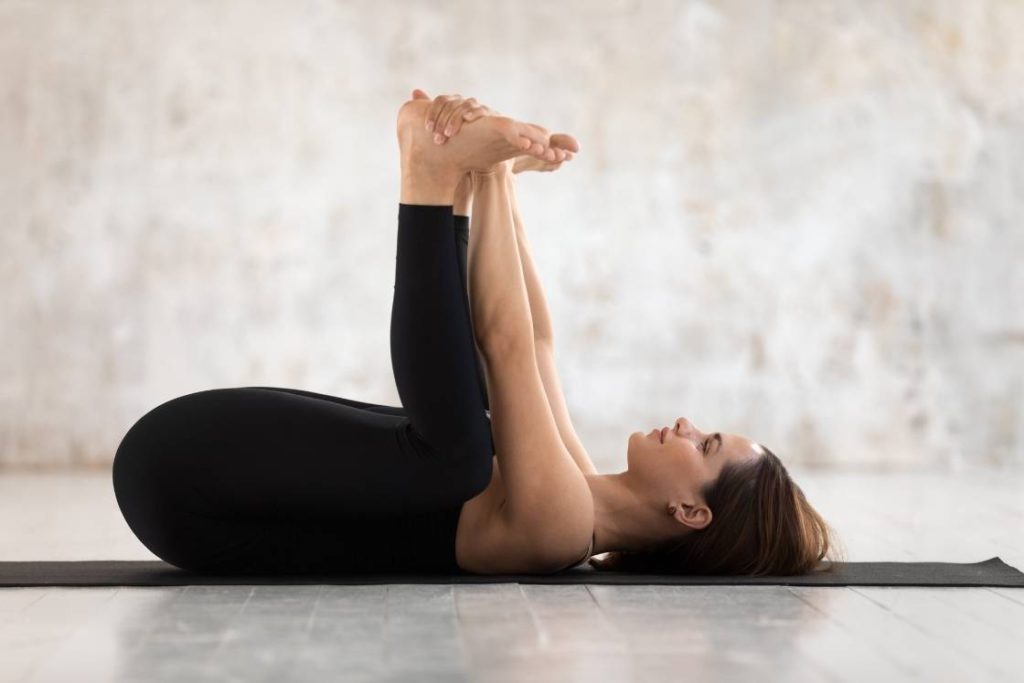
Happy baby pose is one of the easier poses which gently stretches the inner thighs, groin, hips, and back. It aids in increasing flexibility and mobility and promotes relaxation. Moreover, it also works towards opening the chest and shoulders.
- Lie down on a mat with your knees bent and feet firmly grounded.
- Gently bring your knees closer to your chest. Place your hands on the outer edges of your feet and firmly hold your feet. You do not need to wrap your fingers around the entire foot as it may strain your arms and shoulders.
- You can also use a strap as an extension of your arms if you have tight shoulders.
- While holding your feet, your head and back should be straight and on the mat. Be aware of any strain or discomfort in your hips, thighs, shoulders, knees, and groin.
- Slowly open your knees sideways till they are outside your torso. To create resistance and more stretch, press your hands on the feet and lower your knees towards the ground.
Hold this pose for 5 breaths.
3. Low Lunge (Anjaneyasana)
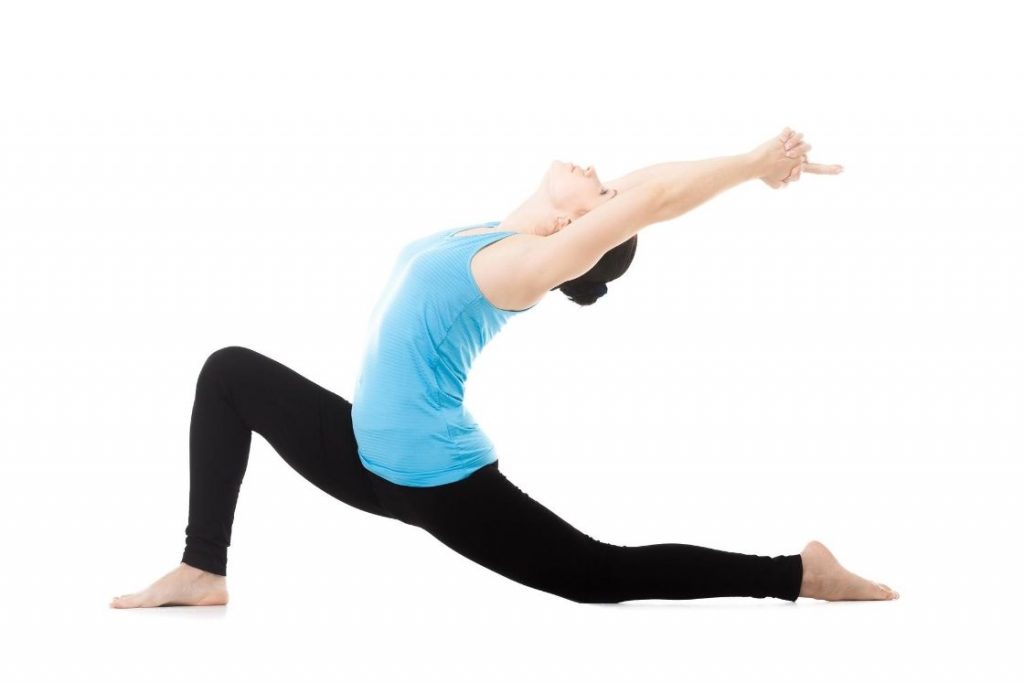
The low lunge is known as a great stretching and warm-up exercise for performing difficult poses and workouts. The pose focuses on opening the hips and legs and releasing pains and tightness in them. You can also perform this pose after an intense workout or yoga session. It also opens your chest and strengthens your spine.
If you are pregnant, you can easily perform this pose by using props to support your hands and legs.
- Stand in a Tadasana (Mountain Pose) facing the shorter end of the mat and bring your right foot forward. The distance between your legs should be 3 feet. You can adjust the distance based on your flexibility and alignment of the center of gravity.
- Keeping both feet firmly on the mat, bend your right knee such that it makes a 90-degree angle. The thigh should be parallel and your lower leg should be perpendicular to the mat.
- Gently and slowly, lower your left leg, which is at the back such that your left knee touches the mat. Place a folded blanket under your knee to get more cushion.
- Bring your arms above your head and join your palms together. You can also keep them in front of your chest or on top of your right knee.
Pregnant ladies can place yoga blocks beside the right knee and place their hands for support.
Hold this pose for at least 5 breaths.
4. Frog Pose (Mandukasana)
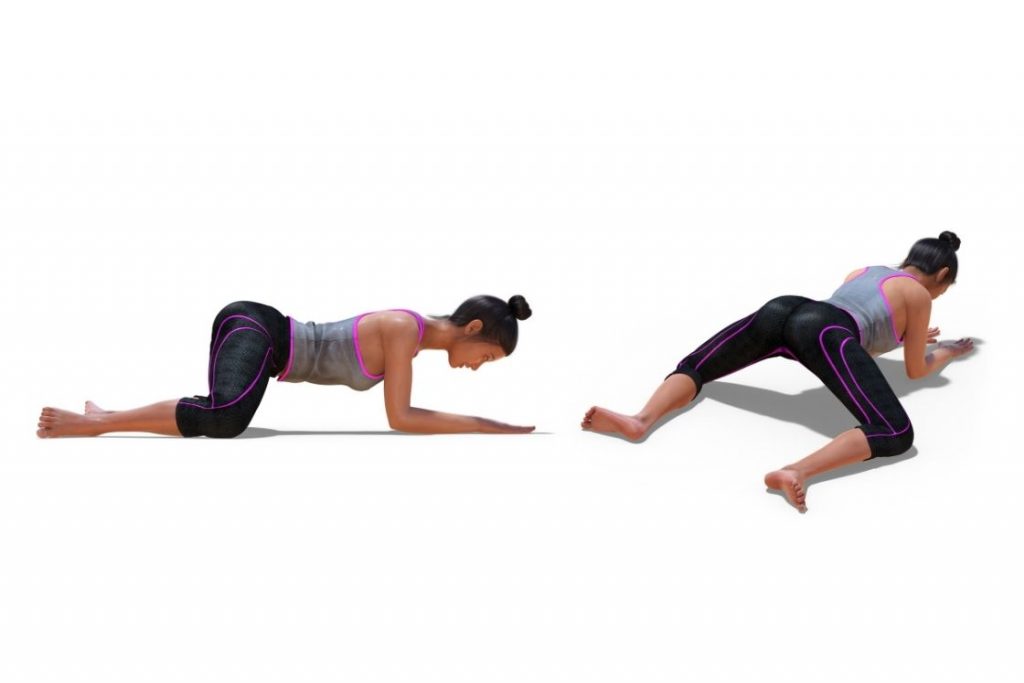
The frog pose focused on stretching and strengthening the hips, core, inner thighs, back, and groin muscles simultaneously. Doing this pose will greatly help in relieving the tightness of muscles caused due to sitting for long hours and pain in your lower back.
This pose is also good for athletes as it enhances mobility. Pregnant ladies can also perform this pose as long as they use props to ease any pressure or weight from their belly.
- Begin by coming in a tabletop pose. Your shoulders should be stacked on your wrists and hips with your knees.
- Once you have found your balance, bring your knees out to the side one by one. Your ankle and knees should be in-line at all times. Your toes should be facing the side so that your feet form a straight line end-to-end.
- Here, depending on your range of mobility, you can adjust the gap between the legs. Also, place a blanket under your knees and ankles if you need more cushion.
- Bend your elbows and rest on your forearms. Keep your palms facing downwards on the mat or joined in front of you. You can also keep your forearms on a yoga block for support and gaining height or a folded blanket for extra cushion.
- Keep your gaze on the mat to align your head with the spine.
Hold this pose for 3-5 breathes with steady breaths.
Pregnant ladies can place a cushion/bolster below their hips and chest to support their belly.
5. Fire log Pose (Agnistambhasana)
Even though it comes under the category of intermediate to advanced poses, fire log pose stretches the hips deeply, opening the outer hips and buttocks. The groins, thighs, calves, and abdominal muscles are also stretched and strengthened. It is better to have some flexibility before performing this pose.
The abdominal organs are also gently stimulated in this pose, which aids digestion and metabolism.
- Start by sitting in a Dandasana (Staff Pose) with your spine straight.
- Bend your right knee and place the ankle on top of the left knee.
- Now bend your left knee and bring the shin under the right shin, placing the left ankle directly under the right knee. If you lack flexibility, instead of placing the left ankle on top of the right knee, you can keep the left foot on the mat just in front of the right knee.
- Be aware of any pain or discomfort in your knees when bending them or aligning them.
- Both your lower legs, from knees to the ankles, will be placed on top of each other. To see if you are performing the pose correctly, look down and see if a triangle is being formed between your thighs.
You can keep your hands beside you with fingertips touching the mat or place them in front of your chest in Anjali mudra.
Hold this pose for 3-5 steady breaths.
6. Garland Pose (Malasana)
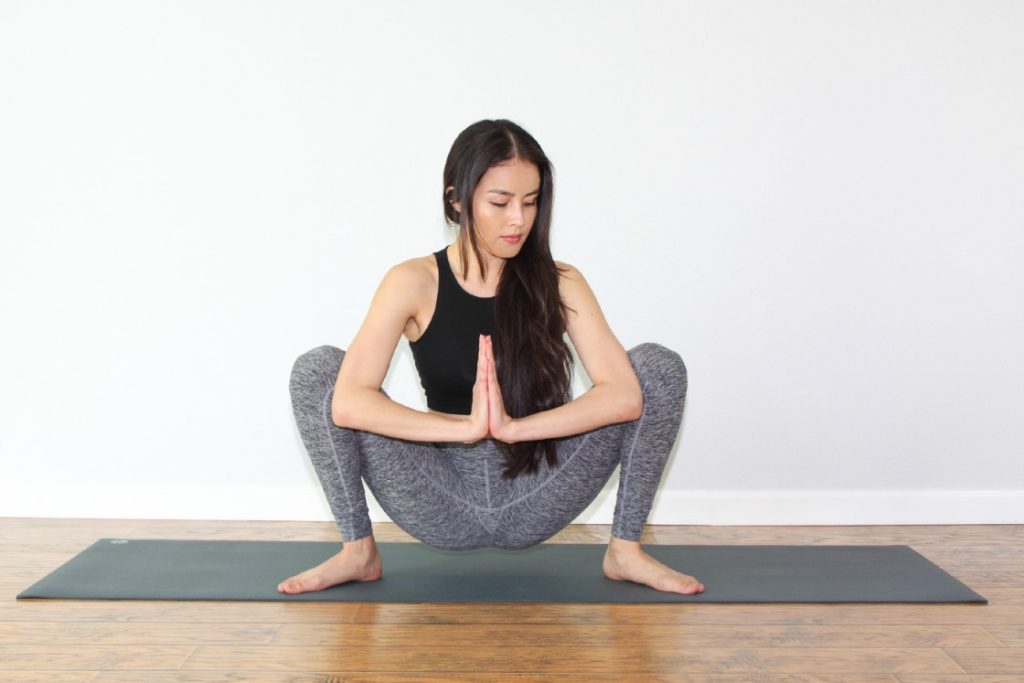
Garland Pose is a wonderful yoga pose for tight hips which also stretches the lower back and ankles. It expands your hips and groin to alleviate the constriction that can occur from sitting for long periods of time. It also strengthens the feet and ankles, expands the chest, and improves blood flow in the pelvis.
- Stand in a Tadasana (Mountain Pose) and spread your feet 3 feet apart or slightly wider than the hip-width.
- Keeping your hands joined in front of your chest, start bedding down and come to a full squat. Turn your feet a little sideways to keep your balance. You can also place a yoga block under your buttocks for extra support.
- Bring our elbows to the inside of the knees to keep the knees from closing in.
- Make sure your spine is straight all this while to avoid any discomfort caused because of unnecessary bending. Your gaze should also be kept forward to keep your spine and head aligned.
- Your shoulders should be away from your years and shoulder blades should be pushed back.
Stay in this pose for 5 breaths.
7. Hero Pose (Virasana)
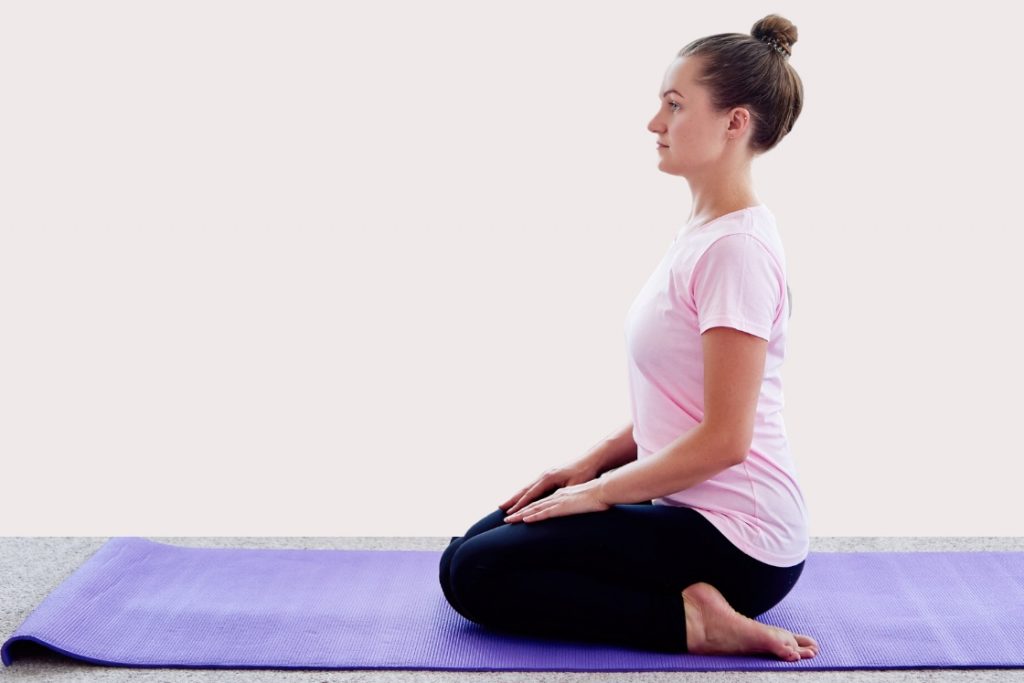
The hero pose greatly helps in opening and stretching the hips, quads, and knees. It improves flexibility in these areas as well as the ankles. The pose also strengthens the spine and corrects the slouching posture. People who are involved in sports performing quad-intensive activities will be benefitted.
This pose can also be practiced during meditation if you want to get away with the traditional cross-legged poses.
- Come to an upright kneeling position with your upper feet flat on the mat.
- Place your hands on the mat and bring your knees together and move your feet are at a distance slightly more than the hip-width. The distance should be enough to place your buttocks between the gap.
- Slowly, move your hips down to sit in between your legs. If needed, create more space by manually moving your shins further. You can also place a yoga block under your buttocks to sit on it.
- Make sure that you are not seated on your feet. Also, the toes should not be tucked in or facing outwards. They should be pointed straight towards the back.
- Keep your spine straight, shoulders away from your ears, and gaze straight towards the front.
- Place your hands on your thigh with palms up or down or in any mudra of your preference.
Stay in this pose for as long as you feel comfortable.
Benefits of Hip Opening Poses
Looking at the importance, you must have guessed some of the benefits you can obtain when you practice hip-opening poses. However, if you still need more inspiration, here are some benefits.
- Practicing hip-opening poses means you will stretch and strengthen various muscles of the hips and the surrounding areas. Thus such poses help in releasing excess stress and tightness.
- They help in releasing pressure from the joints and distribute the weight equally with the muscles and tissues.
- With the excess pressure lifted off the joints, your hips will gain strength to support your upper body in a better way.
- The more your muscles loosen, the more mobility and flexibility will be achieved.
- It also reduces muscles soreness caused due to uneven distribution of weight on the muscles.
- Tight hips often cause lower back pains. Many hip-opening poses are forward bends or folds which aim to stretch the lower back muscles as well. Thus, it helps alleviate lower back pains.
- Hip-opening poses correct the alignment of your knees, ankles, back and release stress from the spine. As a result, it also helps in improved flexibility, range of motion, posture, and stride.
- Any accumulated stress caused due to past emotional events, traumas, or heartbreaks will be released. This will also lead to a positive state of mental health by decreasing anxiety, sadness, grief, guilt, etc.
- It stimulates and activates the sacral chakra and promotes an increase of creativity, passion, enjoyment, and emotions.
Conclusion
Hip-opening poses are some of the most practiced poses in a yoga session as it has become the need of the hour. With such a busy and stressful lifestyle, we do not focus on the areas that sometimes take much of the burden and pressure.
If you practice these poses on a regular basis, you will not only feel light but will also improve your posture and feel more confident. And while working on your hips, you will also be stimulating other important areas of your legs that also do not get enough attention.

: Steps, Benefits, Variations")
")

